
Gardeners, Crafters and Scavengers:
If you’re looking for a fun, easy project—and perhaps a new revenue stream—consider making beautiful flower plates for your garden, or to sell at craft shows. They make lovely gifts.
I’ve seen these at local art shows and in this stunning collection on Etsy. But I haven’t had the time to figure out how to make them on my own. And I don’t trust myself with a tube of glue.
During my vacation last week in Columbus, Ohio, temperatures between 100 and 110 made it impossible to do anything outside. So my sister, Lois Heinlen, who can duplicate almost any type of craft imaginable, led my other sister and me through a daylong flower-making extravaganza.
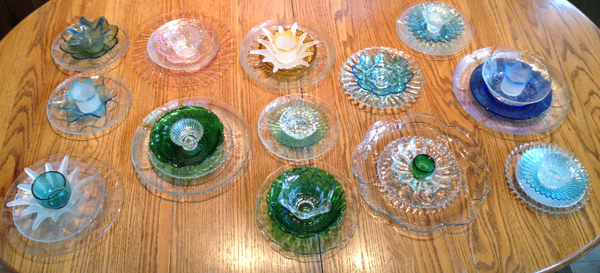
Yield: 19 glass flowers in a variety of sizes and colors. Here are some of them:
We prefer plates with clear or colored glass, but you can just as easily use ceramic plates in crazy or subtle patterns.
What You Need:
- A collection of plates, saucers, votives, and other glassware. Each piece will be the “layer” or the center of a flower.
- One hockey puck for each flower, used to attach the flower to the metal rod that you stick into the ground. We bought ours at Play It Again Sports, a new and used sporting goods store, for about $2.50 each. Make sure the pucks are new, not used.
- A threaded rod, one per flower, 3 feet long and 3/8-inch thick. We bought ours at Home Depot for $2.87 each.
- A tube of E6000 (epoxy adhesive). We bought a one-ounce tube for $2.97 in the craft department at Wal-Mart. One tube is enough for several flowers.
- Rough sandpaper.
- Green Rustoleum. We used fast-drying Rustoleum Paint Plus, ultra cover, satin finish, in club green.
If you’re starting from scratch, here are step-by-step directions.
Step 1: Hit the thrift shops.
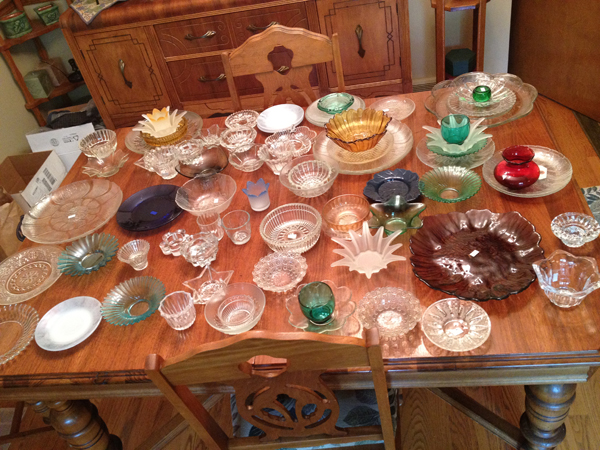
You can find plates, saucers, votive lights, ashtrays and other glassware, many for less than $1 each. If you’re lucky, you’ll find the glass ends of doorknobs, or glass baubles that you can use as the centers of flowers. We even found several collectible “salts” at a thrift store, for 35 cents each. Beautiful for the center of a flower! When we returned home and emptied our bags, we had two tables filled with glassware. Here’s one of them:
Step 2: Clean the glassware.
Wash in warm, soapy water. Use Goo Gone to remove stubborn stickers, though all of ours came off in the dishwater. Dry thoroughly.
Step 3: Assemble the flower.
This is the fun part. Divide all your glassware by sizes. Then mix and match to see which pieces look best stacked atop each other. We used three or four pieces for each flower.
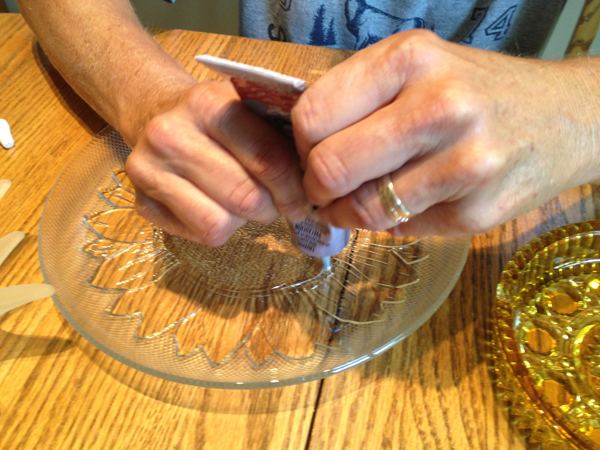
Step 4: Glue the first two pieces.
After you’ve selected your glassware for one flower, take the largest piece (Piece A) , which will be at the bottom, or back, of the flower, and place the next largest piece (Piece B) on top of it. Turn over Piece B and squeeze a thin circular line of epoxy onto the center of the plate. Gently place it onto Piece A, then remove it quickly, so you can see exactly where to apply the second layer of glue on Piece A, as my sister is demonstrating below. Apply glue to Piece A and let both pieces sit, unattached, for about two minutes. Attach both pieces. Once the glue starts to dry, don’t try to move the top plate or you might crack the glass.
Step 5: Glue the remaining layers.
Repeat the process until all pieces are glued together. Let dry for about two hours.
Step 6: Sand the hockey puck, and drill a hole.
Using course sandpaper, rough up one flat side of the hockey puck. Place the puck in a vice, outer edge toward you. Using a drill with a 3/8-inch bit, drill a hole about an inch and a half to 2 inches deep. (Warning: The smell of burning rubber is ghastly, and the drilling makes a mess. Do this in a well-ventilated garage or on your driveway.)
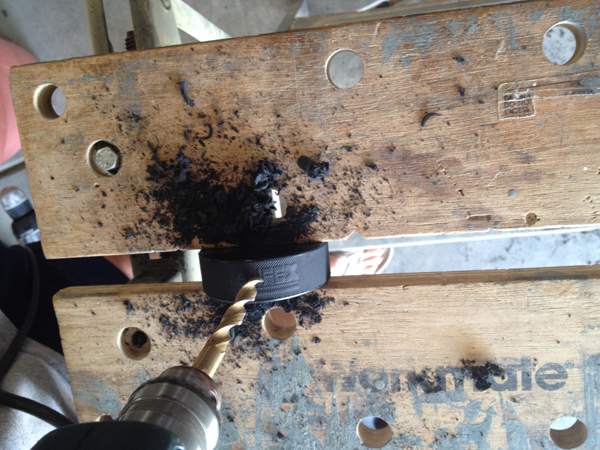
Step 7: Glue the puck.
Apply a generous layer of glue onto the entire sanded side of the hockey puck. Wait two minutes. Attach the puck to the back of the largest plate. Wait 72 hours for the puck to dry.
Step 8: Paint the rod.
Paint the rod green, using Rustoleum.
Step 9: Attach the rod to the puck.
Insert the rod into the hole in the puck. If it doesn’t go in easily, turn the rod to the right and keep turning until you can’t insert it any farther and you have a tight fit. You don’t need to use glue in the hole. If the rod is too big for the hole, drill a slightly bigger hole.
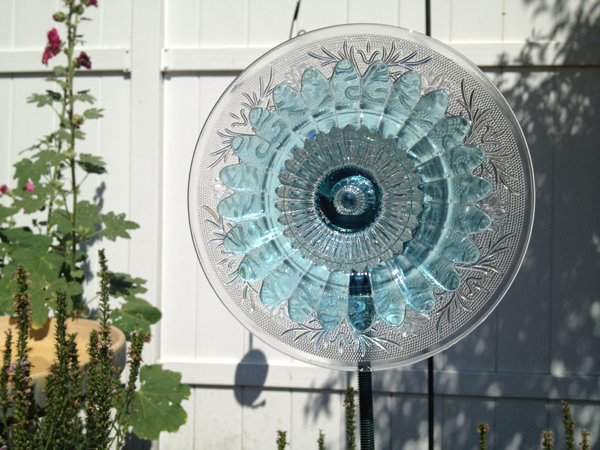
The hardest part of this entire process is figuring out where in the garden you’ll place your work of art. As you can see in the photo on top, I placed mine near my maroon holly hocks, next to the bird bath. (Bird poop splattered on that beautiful etched glass! Do you think I should move it?)
Other Tips:
- You may be tempted to buy expensive glassware from antique stores. We sure were! But this quickly drives up the cost of the flowers. If you’re selling these, you’ll never recoup your investment and make a decent profit. But if you’re making a few of these for yourself and can afford to splurge, go for it.
- Visit thrift shops frequently because they restock shelves constantly. Don’t hesitate to ask owners of smaller shops to call you if they get colored glassware or pretty plates they think you’ll like. Show them a sample of what you’re making and bribe them with a free glass flower!
- Look for candy dishes, too. I found a lovely candy dish with a large clear glass plate. It was attached to a metal handle that I was able to unscrew easily.
- Clear glass plates are easy to find, but colored glass isn’t, so buy it as soon as you find it.
- Keep the epoxy out of the reach of kids and pets.
- Bring your plates inside during the winter.
Will You Make These?
This craft is easier than it sounds.
But I’m curious. Would you rather skip the entire process and buy flower plates on Etsy? Or do you think you’ll make these? If you do, take a picture and link to it here. Also check out my Flower Plates Garden Art board on Pinterest.
Do you have ideas on how to make these flowers even more beautiful? Do you like clear glass or colorful ceramic plates? Do you use rebar instead of a metal rod? Other ideas? Share them here.
I’m displaying my plates in my garden and giving them as gifts but have no plans to go into the flower plate business. But boy am I tempted. And I can’t stand the thought of passing up a valuable piece of stunning glassware with a 75-cent sticker.
Coming Next: How to publicize your garden art or other crafts.
Ok Joan, when are we going shopping? All we need is the glue.
I’m ready when you are. I can stop by Wal-Mart on the way to Goodwill.
Wow–are you talented. They are beautiful. I can’t do anything with my hands. So I appreciate everyone who does.
[…] article originally appeared on The Publicity Hound’s Blog and has been republished with […]
Nice work! Even if it is 110 degrees you find a way to be productive!
We were lucky. More than 200,000 people in the Columbus area were without electricity, some for as long as a week, because of terrible storms.
Jerry and I replenished our glass supply, and have enough to make about 15 more flowers. We don’t know who we will give them to as yet, but that won’t stop us. Maybe I’ll just put them all in our yard, since the drought this summer and hungry deer have done damage to our flower gardens.
Tip regarding keeping the deer away. I learned this from another gardener this past weekend. Sprinkle a product called Deer Scram along the perimeter of your property. You don’t even have to mix it with water. This woman lives in the country and hasn’t had one problem with deer since she started using this. You can even buy it on Amazon!
Thank you for the complete and exact instructions on how to make the plate flower garden art. I have collected the glass pieces but was unsure how to mount them successfully and was unable to find a craft book giving instructions. With your help I hope to put together six plus flowers to donate to our community fundraising event in November. All proceeds go to our local fire department and E.M.S. to buy needed equipment. You have done a great service and I so appreciate you!
Cheryl, it’s so gratifying to know that the garden art blog post, that I wrote just for fun, has resulted in a great community service project! If you get a chance, post the photos to my Facebook page at http://www.facebook.com/PublicityHound.
I also make these and I sell them at craft fairs. We use a drill press and drill holes through all the plates, tea light holders, candy dishes, etc. etc. Then we use 3 1/2 inch screws with wing nuts, the center is usually a crystal drawer knob I buy on ebay in various colors. I find by not using glue and drilling the holes they withstand everything from rain, snow and the heat of the sun. Make sure if you do drill use a diamond bit, I use a drill press for everything except the large plates, that is where I use a hand drill.
Lorraine
Great tips, Lorraine. Do the dishes ever crack or break when you drill them, or does the diamond bit solve that problem?
I also use a drill press with diamond drill bit. Works great. You need a catch plate though, so the water doesn’t run all over your drill press. Works like magic.
Your instructions are great! I do have a couple of questions…how do you pound the rods into the ground without breaking the glass? Do you “plant” the rod then force on the glassware? How much of the 3′ rod goes in the ground? I live in KY. and we can have harsh winters, do the glass flowers overwinter outside? Loving this project!!!
Thanks, Rhea
Don’t pound anything because you might break the glass. Stand over the glass flower and grip the rod with both hands and push it into the ground. I’m not sure how much of the rod goes into the ground, may 3 to 4 inches or so. I have not “overwintered” these and I’m not going to experiment with that. These are too pretty to be damaged by ice, snow and sleet. I live in Wisconsin.
Good luck, Rhea, and thanks for stopping by.
I would suggest inserting the metal stem into the ground to a depth of 8 to 12 inches for enough stability to compensate for wind, rain and the weight of your plate flower. It’s best to get your metal stake into the ground first, ( using a hammer ) then place your flower in position. Good luck. Sharon C. From Indiana
Be VERY careful if you’re hammering anything. I’d rather just wet the ground so I can push the rod in more easily instead of hammering. Thanks for stopping by, Sharon.
Thanks Joan, I’m an artistic dabbler always fascinated with the possibilities of turning a discarded item into something useful and beautiful. This project gives me ideas!
Martha, if you create these pretty flower plates, send a photo and I’ll link to it from here.
my wife saw a garden plate decoration at a thrift store it wasn’t for sale but she came home with a bunch of plates etc.She has made 10 of them and we live in SD Calif.my brother and sister-In-law has never seen anything like them and they are from PA.Amish country visiting.What do these garden plate decoration sell for like at a swap meet or arts n craft fairs.Thanks for your time
I’ve seen these priced from $20 to $30, Tom. You have to test the pricing and see what works for you.
You can go on “Etsy” and type in glass plate garden art in search bar. There you will see a variety of glass plate garden art sold by crafters and you will get an idea of the price for these items. The average cost is around $30 but I’ve seen some that run as much as 100.00.
At a festival I saw a craftsman attach the stake by using a square jar glued to the back (we don’t live in an area with hockey pucks!). Her’s was also a two-sided flower. I’m collecting plates and will soon make one of those for a friend WHEN I find the right, small jar with flat sides, to hold the rebar, conduit or plastic-coated tomato stake. The latter will hold the flower up over the planting bed AND will go deep into the group to prevent tipping over.
I don’t remember seeing anything like that. I’m curious.
Some people use the glass salt/pepper shakers found st the dollar store glued to the back. Then they slide right over the rod.
Hi, I’ve been gathering plates for a bit, but wasn’t sure about glue. Also instead of the hockey puck I used a Plumbers bell. They come in a couple size and are adjustable so you can use copper pipe or pvc for your stems. If you are putting out several each summer, take a 10″ piece of pvc a bit bigger than your stem, cut one end at an angle and hammer it flush into ground. Then slid your flower stem into it. Then next year just clear your weeds out and you’ve got a spot waiting for your beautiful plate flowers.
That’s a great idea, Susan. Thanks for sharing.
We used plate hangers, the kind that hook on to the plates and have springs that stretch. Then my husband drilled a hole in the copper tubing. We attached it all with wire. No worrying about glue holding a spoon on the back. Some of these flowers can get quite heavy.
that’s an excellent alternative, Beth. thanks for sharing.
Hi,
I saw flowers like these on a Wisconsin golf course and thought they would be fun and somewhat easy to make.
I’ve gathered enough plates for about 20 flowers to donate to the annual fundraiser at my church for WCYC. (Wisconsin Christian Youth Camp)
Your instructions make it sound EZPZ…thank you!
But I do have a question:
I found E6000 industrial strength adhesive and it says permanent bond, washer/dryer safe, photo safe and flexible. Doesn’t say a thing about being epoxy or suitable for outdoor exposure. It’s made in the US by Eclectic Products.
Is this what you used or some other product?
I’d hate to have the flowers come unglued!
Thanks.
I don’t know the answer to this question, Joan. Try googling it to learn as much as you can about this product. Or call the company.
Use the E6000 that is for windows & doors. It holds up better with change of seasons.
What if you want to display these to sell? How do you show them?
If you’re at an outdoors event like a flea market, stick them right into the ground. If inside, you can try a heavyweight styrofoam. Next time you’re at an indoor event, look to see what other vendors are doing for their displays.
May I ask why used hockey pucks would not be ok?
Perhaps because they’re difficult to find. We found them at a used sporting goods store.
Thank you for this wonderful process and your displays. Can’t wait to try it. I’ve had dishes saved for years and never got around to it. Thank you.
What could be used in place of.a.hockey puck?
These Flower plates are beautiful!!!
I’m not particularly confident of my ability to make one but I do have craft mall nearby. I will take a look at the dish ware available.
Thank you for your article.
You might make a few mistakes, we certainly did! But that’s OK. Try again.
I have used t shape over fittings on back then I either bet rebarb the size of fitting or o go to Bobby lobby and buy the wood poles to its size. paint them. can even add metal leaves to wood post with screws and get creative. using the pvc fittings also allows you to put chain through if you’d like to hang on fences